
Index
- How to Get Started with PYP Reports
- Creating Report Templates
- Proofing & Review
- Preview and Generate Reports
- Frequently asked Questions
How to Get Started with PYP Reports
▶️ Feature Video Overview
Review the overview video, along with step by step guidance on how report cards are generated on ManageBac+:
Introduction to PYP Reports
Highly customisable, fully integrated with teacher gradebooks, and tailored for IB PYP assessment, ManageBac+ report cards are generated in PDF and are instantly available for students and parents to view.
To begin, navigate to Reporting > Generate Reports and select IB Primary Years from the drop-down menu.
How Teachers Enter Grades & Comments into Gradebooks
Under Class > Gradebook > Term Grades, teachers can Submit Term Grades. Here the teacher can assess units, subjects, scope & sequence, Approaches to Learning, Learner Profiles, Comments and Rubrics.
Under Reporting > Proofing & Review, you can view programmes and subjects to see which teachers have submitted their term grades. As an admin user, you can directly edit these grades here.
Creating Report Templates
Customise Report Templates
Via Reporting > Templates > IB Primary Years
To edit an existing template, select the template from the list of available templates.
To add a new template, select Add New Template or Add Template from Library on the right-hand side of the page. These are the types of Reports you can select from the Template Library:
- Progress Report - Single page report card with student details and classes with rubrics.
- End of Term Report - A full term report card with multiple sections and different assessment components for different program components; differences in the templates per program will need to be in the program-specific components; most closely aligned to traditional long form report card
- Narrative Report - To be created as longer template that focuses on comments as assessment and reflection components
- Core Report - A report template that shows non-class information and assessments; different components per program needed, should also include Assessment Explanation and Grade Descriptors to show information about assessment rubrics
- Standard-based Grading (SBG) Report - A report template to show standards-based grading in all classes; will be long report card depending on how schools have implemented standards; needs to be prefaced by assessment explanation
In the following we list the different template sections of the legacy PDF Reports and explain how the same contents can be included in the current Report Templates with custom sections and components.
Template: Overview
When Adding a Template, you will be able to customise the following in the new template modal window:
- The Template Settings: This allows schools to set template configurations and sections that are the basic building blocks of web report templates.
- Set the background image that best fits your template.
- Provide a unique name for the template. The name can not be used for any other template already.
- Select whether the Reports of this template are meant to be Final or Interim reports
- Add as many sections as needed to build the template structure.
- Select which PDF Settings apply to PDF copies made with this particular report template and then click
- Add Template to create the new report template.
Template: Cover Sheet
Details and Signature components
Each Section can include Components by clicking Add Component when a Section is selected. Typically, Report Cards in PDF always included a Cover Sheet with certain school specific information. These components have been created for the new report templates and can be found when adding Report Details or Student Details or Signatures to a section. However, where previously these types of content were limited and set to specific parts of the report Template, they are now customisable and can be added to any section at any place within the template.
Certain Components, like Student Details or Report Details, also come pre-built with different versions in their layout to allow for even greater customisation of the report card template. Remember to click “Save Changes" at the bottom right every time a change is made to components or customisation of those within a section.
Template: Letter
Text Box components
What used to be listed as a separate portion of the report template under "Cover Letter" is now available in any report template section utilising a Text Box component. The text box components all include a full rich text editor functionality so that files, photos, video links or tables can be added to them.
Text Box components are no longer limited to the Cover Letter portion. They can be added with pertinent information in any Section of the report template.
Template: Summary
The Summary tab includes all the Gradebook information filled in by your teachers. This includes:
- Summary Header Section: You can customize the Summary of Achievement section title. You can also select whether you would like to show the standard header size, use a larger header or hide the section header on the Report Card.
- Observation Comments: Select whether or not you would like to allow Observation Comments on the reports as well as whether or not you want to Show Teacher Names on Observation Comments.
-
Unit Assessment: Select the unit fields you wish to appear on the reports, including Unit Duration and Date, Unit Description, Class Name, Subject Focus, and Related Concepts.
- Choose the Unit Fields to Show on Reports as well as the Unit Templates you wish to be shown on your reports.
- You can also turn on/off the Overall Unit Assessment Score
- Turn on/off the Teacher Comments for each unit
- You can choose to show One Unit per page or Many. If One per page is selected, Units will move automatically to the next page if the previous unit was displayed on the page. If the Many option is selected, space is saved and the Unit will be displayed after the previous Unit ends.
- You can show or hide the Subject Assessment on your report cards.
- Turn on/off the Teacher Comments for each Subject
- You can show the Unassessed Learning Outcomes for each Subject or hide them.
- You are also able to customise whether or not you want One or Many Subjects per page on your reports. If One subject is selected per page, subjects will automatically move to the next page of the report if the subject does not fully fit on the first page This ensures that each subject's grades and comments are entirely on One page. If Many subjects are selected per page, space is saved by allowing subject grades/comments to be split over two pages if there isn't enough space on the first page.
-
Learner Profile: Choose if you wish to display assessment marks, hide any un-assessed attributes of the Learner Profile, include or exclude Learner Profile descriptors, and include or exclude the Learner Profile diagram taken from the IB.
- If you would like to show the Learner Profile Diagram and description on a separate page with no grades or comments, please follow the choices above.
- ATL Skills: Turn on/off the graded ATL skills and/or teacher comments beneath the ATLs.
- At the bottom of the page, you can customise your terminology for each section to better match your school community's understanding of what is being graded. For example, the sections for Observation Comments Title and Teacher Comments Title, highlighted in the screenshot above, can be renamed. Enter the preferred titles in the boxes below these options, and click Save Changes once done.
- Lastly, you are able to add in up to four Signers via the Signatures section with an optional Advisor that you would like to show up on the Summary page of your reports.
Via Assessment
Write your own custom assessment explanation, or use our default written by our IB PYP Curriculum expert team.
Via Attendance
if your school subscribes to the ManageBac+ Attendance Module, attendance data can also be added to Reports Templates via the Attendance tab.
You can choose which Attendance Categories to display on the report cards based on the Academic Term dates or for the whole academic year.
Homeroom attendance can be displayed on the Cover Sheet or Summary of Achievement.
If you're not currently using ManageBac+ for Attendance, but are interested in learning more about the module and how it automatically links to the report card, email us at sales@ManageBac.com.
Generate a preview
To generate a preview for an individual student, you can navigate to Reporting > Generate Reports > IB Primary Years and follow the below steps:
- Select an Academic Term.
- Select your Report Template.
- Select a Year or Grade Level.
- Select a student.
- Click on Generate Preview.
Once generated, a PDF of a Preview Report will export with an example of the individual student's Report.
Proofing & Review
Proofing & Review is a feature available for any school with the reports module and allows administrators to view and edit grades and comments from each class before generating reports.
Via Reporting > Proofing & Review > IB Primary Years
- Waiting = Some gradebook fields have been completed, but not all
- Submitted = All gradebook fields have been completed
Prior to proofing, we recommend locking term gradebooks.
Admins can lock and unlock gradebooks by programme & academic term, this ensures grades are not changed after a certain date before reports are generated.
Logged in as an admin, navigate to Settings > Academic Terms.
- Select your programme
- Tick Restrict teachers from making any changes to term grades
- Save Changes
Please note that administrators will still have full access and editing permissions when gradebooks are locked, to ensure a seamless proofing and review process.
You can also access the Lock Term Gradebooks page via Reporting > Proofing & Review, on the right navigation panel.
Reflections
Click the Reflections tab to read and edit the reflections of the Student, Homeroom Advisor, Coordinator, Head of School or Counselor. These reflections can then be enabled on the report card via the Report Template Overview tab (see below).
Preview and Generate Reports
Via Reporting > Generate Reports > IB Primary Years
To generate your reports, please first confirm the following data:
1. Term: Select a term with the correct grade data.
2. Template: Ensure that your selected template includes your desired information and excludes other information. You can easily adjust your template by clicking Edit Template. You can have an unlimited number of templates.
3. Years: Choose to generate reports for all year levels at once, or specify which years will have reports generated. (This setup allows you, for instance, to generate reports for Grade 9 using one report template, and then generate for Grade 10 using another template.) If you would like to include non-IB grades, tick the checkbox and specify the term.
4. Next, give your report a Title (e.g. First Semester Report).
5. Choose your Sort Order, and indicate what information you want to show in the Report Card file name.
6. Indicate the Preparation Date.
7. Select a future release date and time if you want to generate the report cards ahead of time and have a scheduled release at a different time. Enabling the Notify parents & students option will also delay the notification emails to be sent until that point in time.
Scheduling Reports for Future Release Date
When scheduling the reports, you will first need to click the Schedule Future Release Date and time, and then Generate Reports. The Notify parents & students option will also delay the notification emails to be sent until that point in time.
This will take you to a page that will display the selected scheduled date. If everything looks okay, you can click Generate Reports.
Once you have clicked Generate Reports, the reports should then also appear in the list of reports on the Reports History page, with a "scheduled" icon next to the reports title to indicate that it will be released in the future.
Preview Student Data in Template Builder
You can view accurate student data on the Report Template Builder by selecting the template Preview icon.
From there you can select a student from the drop down and select an academic term. You can select academic terms for each programme selected in the template and then Save Changes.
The student's data will replace the default data in the Report Template builder. You can select Reset Student Selection to return to the default data.
Previewing Report Cards
Preview Individual Reports: Click this option to view an individual student report. This is a quick & easy way to see what report cards will actually look like.
Generating Report Cards
Once confident that reports are ready, click the Generate Reports button. A full PDF will also be generated and stored as a master copy in the list in the Reports History tab.
Note that reports are generated one at a time. Each report job may take up to 60 minutes, depending on the number of students you are generating for and the time of year (Dec and May are busy reports seasons!).
Viewing Individual Student Reports
To view an individual report, navigate to the Reports section in the student’s profile. The report card is available via PDF for parents, students, and teachers to view, and stays with the student profile for as long as the student has a ManageBac+ account.
Reports History
Reports History is where all generated report card sets (including Drafts) from a selected academic programme will appear. The reports will remain here indefinitely, unless deleted. From Reports History, you can view individual web reports and download PDF versions of individual reports.
Frequently asked Questions
Hiding Reports from Students & Parents
Hiding Reports via Student Profile
Admins and teachers will still able to view the reports when they are hidden. Only admins can hide or unhide the reports, while teachers will be able to see that the reports have been hidden.
Students and parents will not be able to access the Reports. Note that reports e-mail notifications will also not be sent to students & parents if their reports have been hidden.
Unhiding Reports
To unhide reports, untick Hide Reports Tab from Student and Parents, click Save Changes.
Students and parents will now be able to access and download any reports as per usual.
Export List of students with Hide Reports enabled
Via Settings > School Directory
Admins are able to export a student list that shows which students have had their reports hidden.
Select Export Student & Parent information download a record of user information in your School Directory.
The Student and Parent information spreadsheet shows if the "Hide Report Cards" option is enabled per student.
Set an Alias to Show a Custom Term Name on Reports
Via Settings > Academic Terms > "Edit" Academic Year
You are able to set a customised term name to appear only on the report cards assessment page by selecting the "Set Alias for Report Cards" checkbox and adding your preferred "Report Alias". Make sure to Save Changes at the bottom.
Excluding Classes and Students from Reports
Excluding Students & Classes via Insights > Reporting > Generate Reports > Manage Report Exclusions
Exclude Classes
To exclude classes, select the programme and grade level of the class(es) that are going to be excluded from report generation. From here, tick the checkbox in the "Exclude" column for the classes that you wish to exclude and Save Changes at the bottom of the page. The classes displayed show several pieces of data related to each class to make it easier to identify the correct class(es) to be excluded.
You can also click on Show Only Excluded Classes to see only the classes that have already been marked as Excluded, and you can uncheck the class(es) that you wish to include back in the report generation.
Exclude Students
To exclude students, select the programme and grade level of the student(s) that are going to be excluded from report generation. From here, tick the checkbox in the "Exclude" column for the student(s) that you wish to exclude and Save Changes at the bottom of the page.
You can also click on Show Only Excluded Students to see only the student(s) that have already been marked as Excluded, and you can uncheck the student(s) that you wish to include back in the report generation.
Exclude a Student from a Class
To exclude a student from a class, select the programme, grade level and student. From here, you can see the list of active classes of which the student is a member. You can then tick the checkbox in the "Exclude" column for the class(es) that you wish to exclude for the student and click Save Changes at the bottom of the page.
You can also click on Show Exclusions to see the class(es) that have already been marked as Excluded, and you can uncheck the class(es) that you wish to include back in the report generation.
Updating Individual Reports
It is possible to update an individual student's report card. After making changes to a student's grades, navigate to Reporting > Generate Reports > Update Individual Reports.
From the Update Reports page, select the following:
- Academic Programme the report card to be updated was generated in
- Academic Term the report card to be updated was generated in
- The student the Report Card was generated for
- The specific Report Card to be updated
- Download the selected Report to confirm this is the one you intend to update
- Select the Report Card Template and Report Title to use for the update
- Select Preparation Date and File Name items for the updated report card.
- Preview the updated report card.
- Click Update Individual Report to generate the updated report card and replace it on the student profile automatically.
Adding Term Goals & Reflections
via Settings > IB Primary Years > Reflections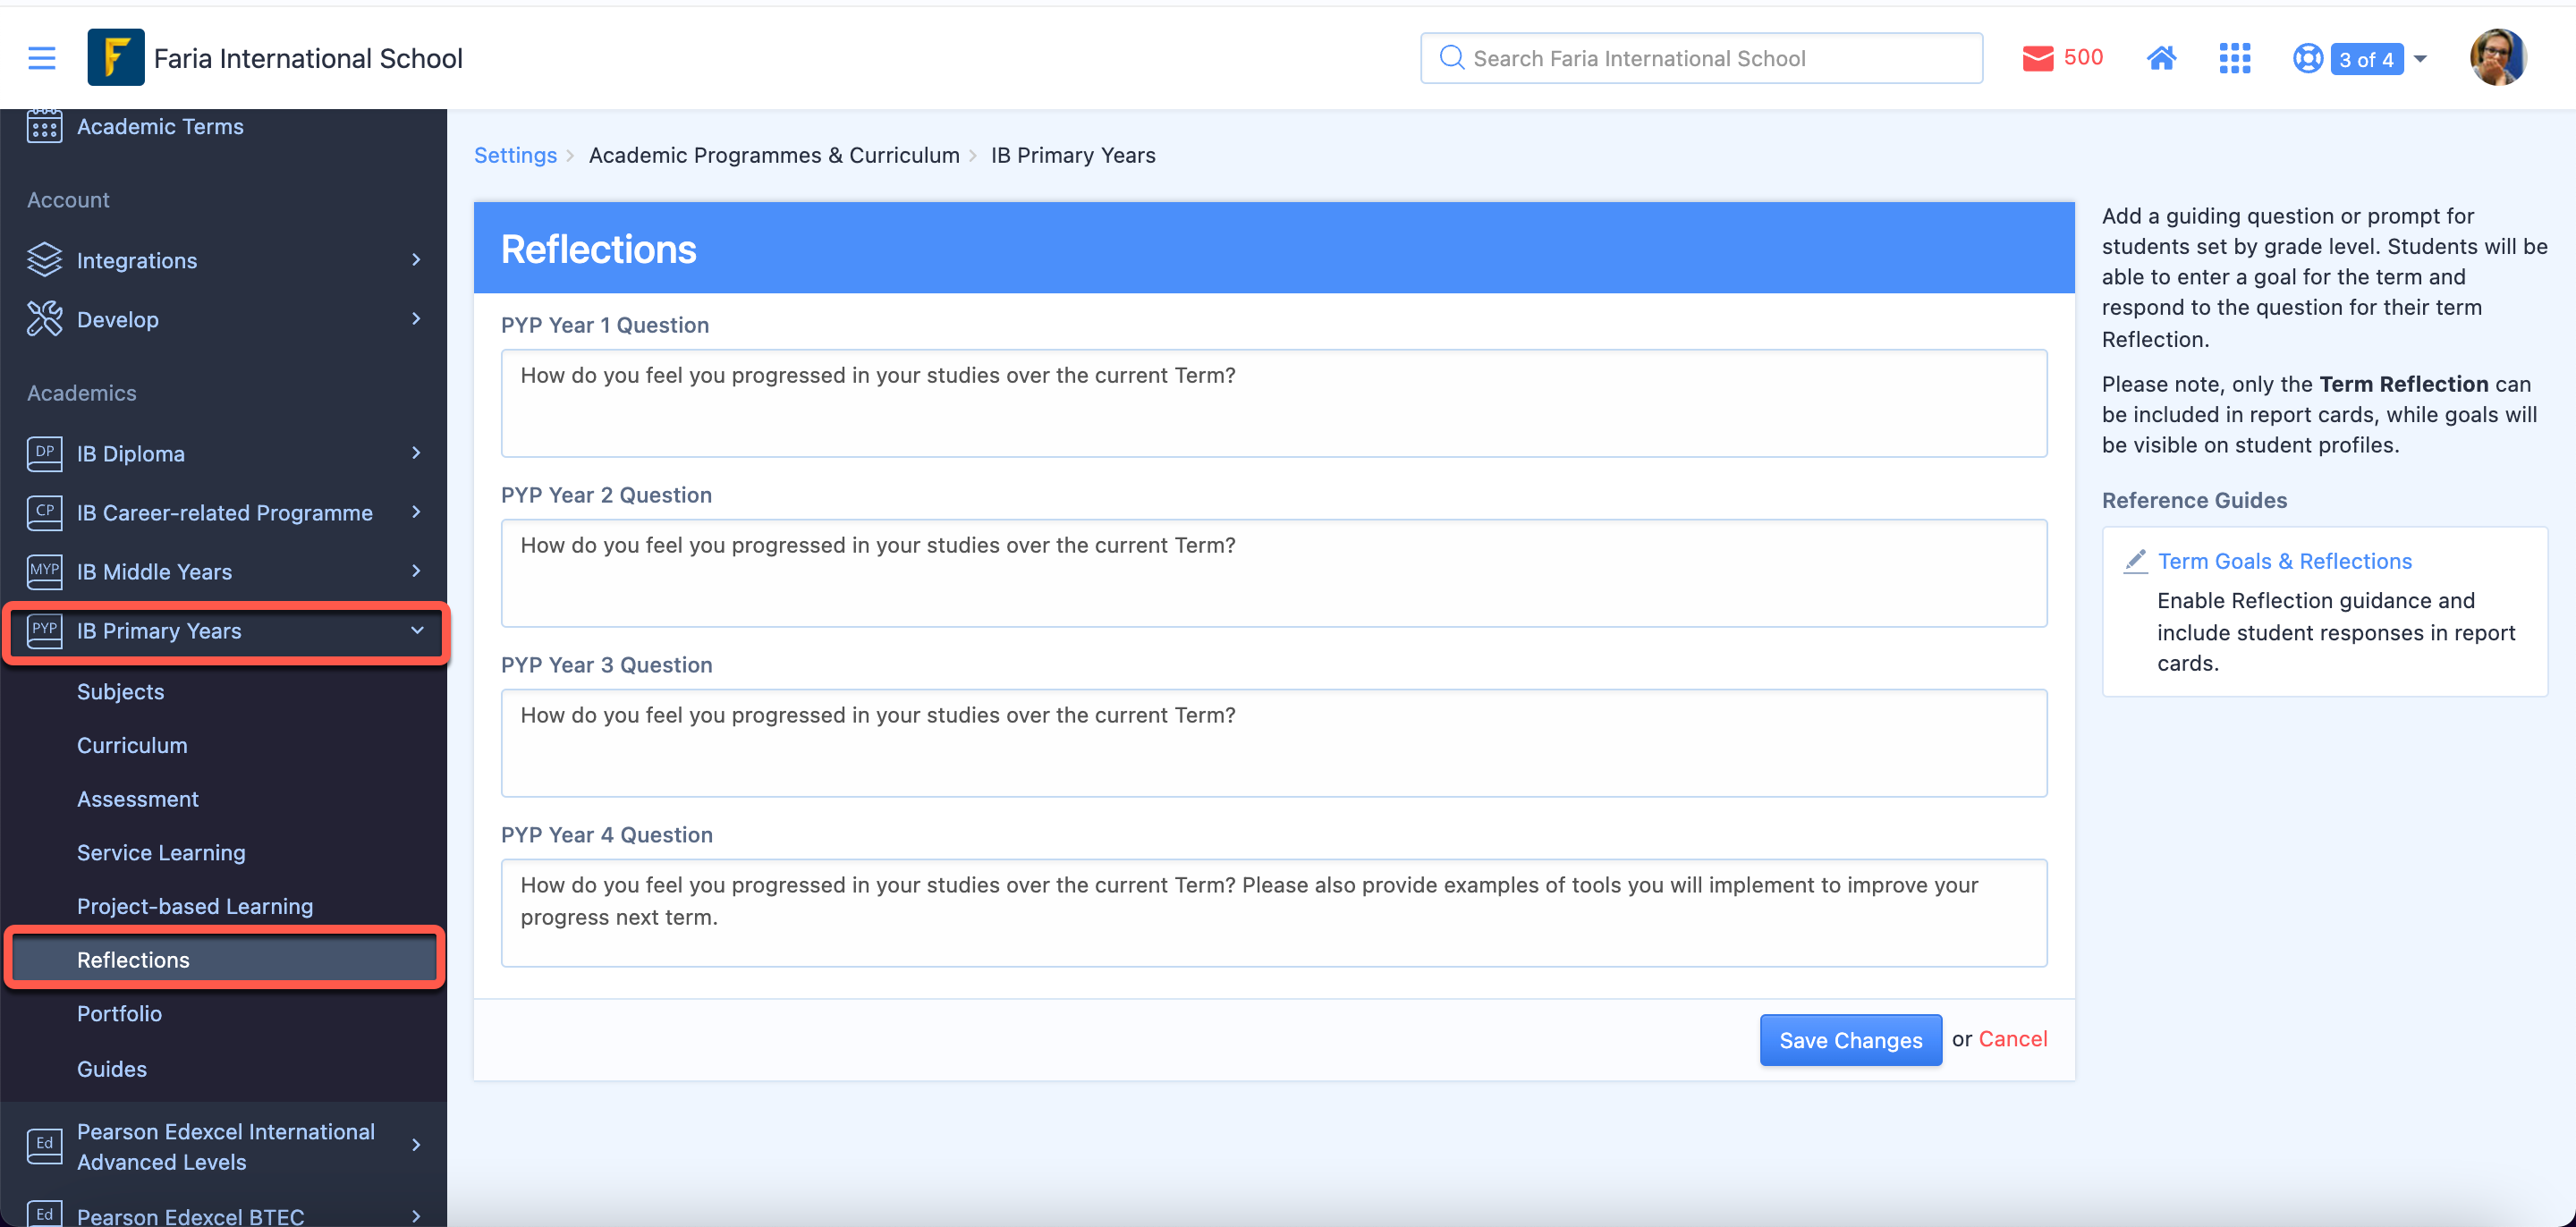
You can enable Term Goals and Reflections Questions for response in Student Profiles via Settings > IB Primary Years > Reflections. The Reflection Question responses can be added to Reports, however, the Term Goals will be viewed only in Student Profiles.
via Student Profiles
Students can respond to the term goal and Reflection Questions you added in your account settings via Profile > Reports & Reflections. Be sure to Save Changes after responding.
Add the student reflections via the Reporting > Templates > IB Primary Years > Select a Template > Overview > Reflections. This will show the Student Responses to Reflection Questions on the Report. It's not possible to include the term goal.
Displaying Student Photos on Reports
To show student photos on your report cards, you must first bulk upload student profile photos on the system. Click on Settings > Import Manager > Students > Import Student Photos to begin. Upload a zip file of your student photos, with each photo name matching a student ID.
Photos should be in PNG, JPEG, or JIF format. For best results, we recommend portrait photos with the dimensions 300px by 300px. Please ensure that each photo is less than 1 Mb.
Once the photos have been uploaded, you can then navigate to Reporting > Templates select IB Primary Years and your Report Template. Via the Cover Sheet page, select the Student Photo checkbox. Your student reports will generate with the student photo on the cover.
Related to